8.3. Image Thresholding#
8.3.1. Sample Images#
In this section, we employ Lunenburg.jpg and Varenna.jpg from my personal image library. Both images were adjusted to a size of 2000 by 1500 to facilitate more straightforward calculations.
Lunenburg (a town in Nova Scotia, Canada) is known for its well-preserved colonial architecture and UNESCO World Heritage status.
Varenna features the picturesque village of Varenna on the shores of Lake Como, Italy, celebrated for its charming waterfront and stunning natural beauty.
from skimage import io

# Initialize empty list for storing images
Images = []

# Define image names and their corresponding URLs
Names = ['Lunenburg', 'Varenna']
Urls = [f'https://raw.githubusercontent.com/HatefDastour/ENGG_680/main/Files/{name}.jpg' for name in Names]

# Load images from the specified URLs and create a dictionary with image names as keys
Images = [io.imread(url) for url in Urls]
Images_dict = dict(zip(Names, Images))
# Import necessary libraries
import matplotlib.pyplot as plt  # Import the plotting library

# Set font properties for plots
plt.rcParams.update({'font.family': 'Calibri', 'axes.titlesize': 16})

# Define a function to display images with titles and optional settings
def ImShow(Images, Names, title='Images', grayscale=False, figsize=(9.5, 4.5)):
    '''
    Display a pair of images side by side.

    Parameters:
    Images (list): List of two images to be displayed.
    Names (list): List of two names or labels for the images.
    title (str, optional): Title for the figure. Defaults to 'Images'.
    grayscale (bool, optional): If True, display images in grayscale. Defaults to False.
    figsize (tuple, optional): Figure size (width, height) in inches. Defaults to (9.5, 4.5).

    Returns:
    matplotlib.figure.Figure: The figure containing the displayed images.
    numpy.ndarray: The array of subplots for further manipulation.
    '''
    # Create a figure with two subplots
    fig, ax = plt.subplots(1, 2, figsize=figsize)  # Create a figure with 1 row and 2 columns of subplots
    ax = ax.ravel()  # Flatten the subplots for easier manipulation

    # Iterate over the first two images
    for i in range(2):
        # Display the image in grayscale if grayscale is True, otherwise in color
        ax[i].imshow(Images[i], cmap='gray' if grayscale else None)
        ax[i].set_aspect(1)  # Set aspect ratio to 1 (square aspect)
        ax[i].axis('off')  # Turn off axis
        ax[i].set_title(Names[i], weight='bold')  # Set image title with bold font

    if title:
        # Set main title if provided
        fig.suptitle(title, weight='bold', fontsize=18)

    plt.tight_layout()  # Adjust layout for better spacing
    return fig, ax

# Display the original images
_, _ = ImShow(Images, Names, title='Sample Images')  # Call the ImShow function to display images

8.3.2. Simple Thresholding#
The function “cv2.threshold” in Python is used to perform image thresholding, a common technique in image processing [Bradski, 2000, OpenCV Developers, 2023]:
cv2.threshold(src, thresh, maxval, type[, dst]) -> retval, dst
This function takes an input image (src) and applies a thresholding operation to it, producing a binary image. The thresholding operation involves comparing each pixel value in the source image to a specified threshold value (thresh). Pixels with values greater than or equal to the threshold are set to a specified maximum value (maxval), while pixels with values less than the threshold are set to zero (or a minimum value, depending on the type of thresholding specified). The resulting binary image is returned as the destination image (dst).
The function also returns two values: “retval,” which is the threshold value used (this can be useful in adaptive thresholding), and “dst,” the resulting thresholded image.
The “type” parameter determines the type of thresholding to be applied, and it can take one of the following values:
cv2.THRESH_BINARY: Binary thresholding, where pixels above the threshold are set to maxval, and pixels below are set to zero.
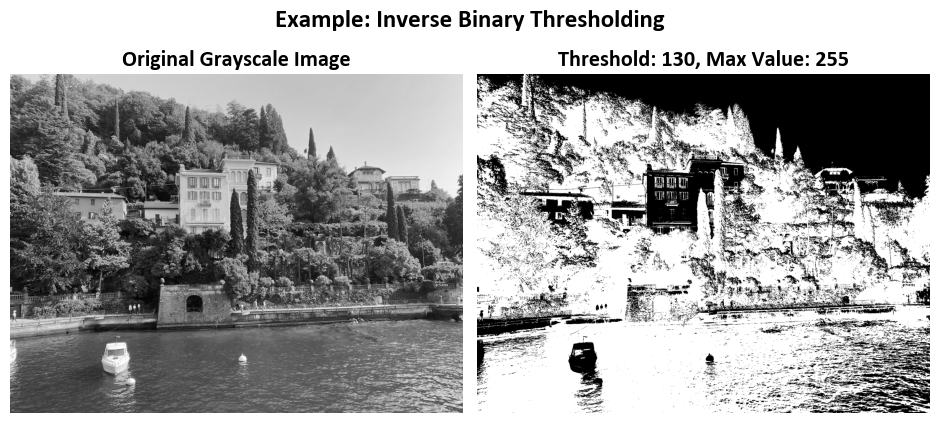
cv2.THRESH_BINARY_INV: Inverse binary thresholding, where pixels above the threshold are set to zero, and pixels below are set to maxval.
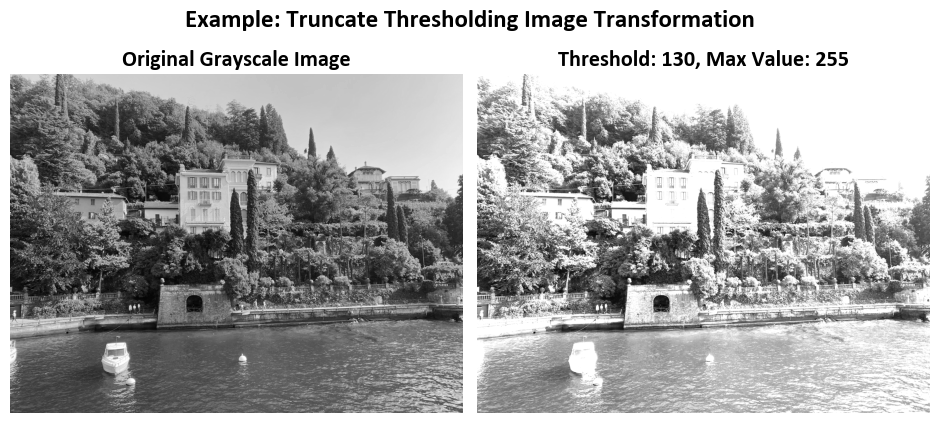
cv2.THRESH_TRUNC: Truncated thresholding, where pixels above the threshold are set to the threshold value, and pixels below remain unchanged.
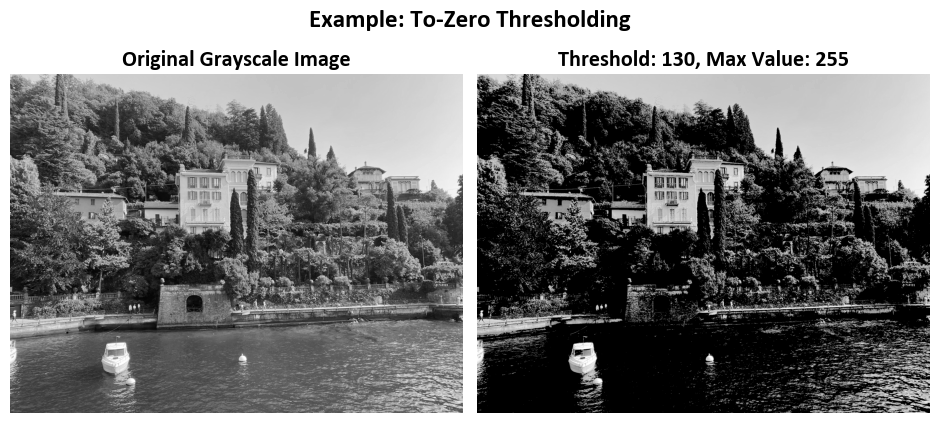
cv2.THRESH_TOZERO: Thresholding to zero, where pixels above the threshold remain unchanged, and pixels below are set to zero.
cv2.THRESH_TOZERO_INV: Inverse thresholding to zero, where pixels above the threshold are set to zero, and pixels below remain unchanged.
The optional “dst” parameter allows you to provide a pre-allocated output image to store the thresholded result. This parameter is useful when you want to reuse an existing image buffer instead of creating a new one.
Remark
The function performs fixed-level thresholding on a single-channel array. It is primarily employed to obtain a binary image from a grayscale one (you can also achieve this using compare()) or to eliminate noise by filtering out pixels with values that are either too small or too large. The function offers various thresholding types, which are specified by the ‘type’ parameter.
8.3.2.1. Binary Thresholding Image Transformation#
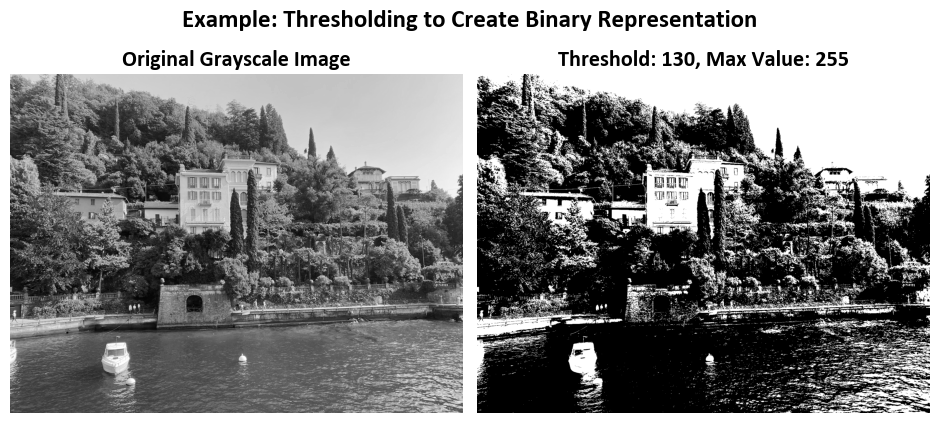
In the context of image processing, “THRESH_BINARY” is a thresholding technique used to convert a grayscale image into a binary image. Here’s how it works:
For each pixel at position
(x, y)in the source grayscale image:If the pixel’s intensity value at
(x, y)is greater than a specified threshold value, the corresponding pixel in the output binary image is set to the maximum value (usually 255).If the pixel’s intensity value at
(x, y)is less than or equal to the threshold value, the corresponding pixel in the output binary image is set to the minimum value (usually 0).
In mathematical terms, this can be expressed as:
This process effectively creates a binary image where pixels are classified into two categories based on their intensity: those above the threshold are set to the maximum value, and those below or equal to the threshold are set to the minimum value. This technique is commonly used for tasks such as object segmentation and feature extraction in computer vision and image analysis.
For more detailed information and examples, you can refer to the OpenCV documentation on thresholding.
Example - Binary Thresholding Image Transformation:
import numpy as np

def img_filter(img, mask, value=0):
    '''
    Perform image filtering by replacing masked areas with white (255) in each color channel.

    Parameters:
    img (numpy.ndarray): The original image.
    mask (numpy.ndarray): A mask specifying areas to be replaced.
    value (int, optional): The value in the mask to be replaced with white (255). Defaults to 0.

    Returns:
    numpy.ndarray: The filtered image with masked areas replaced with white.
    '''
    img_filtered = img.copy()
    for i in range(3):
        img_filtered[:, :, i] = np.where(mask == value, img[:, :, i], 255)
    return img_filtered
import cv2

# Iterate through the Images dataset
for Img in Images:
    # Convert the image to grayscale
    Img_grayscale = cv2.cvtColor(Img, cv2.COLOR_BGR2GRAY)

    # Apply thresholding to create a binary mask
    _, mask = cv2.threshold(Img_grayscale, 130, 255, cv2.THRESH_BINARY)

    # Display the grayscale image and the binary mask
    _ = ImShow([Img_grayscale, mask], ['Original Grayscale Image', 'Threshold: 130, Max Value: 255'],
              title='Example: Thresholding to Create Binary Representation', grayscale=True)

    # Apply a filter using the binary mask
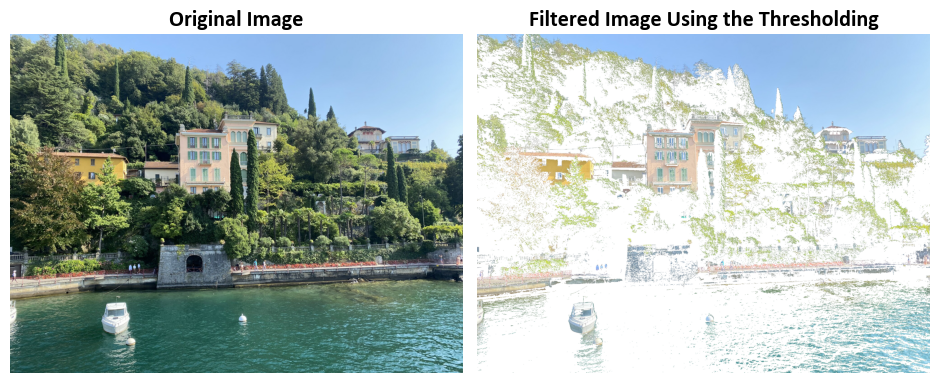
    Img_Filtered = img_filter(Img, mask)

    # Display the original image and the filtered image
    _ = ImShow([Img, Img_Filtered], ['Original Image', 'Filtered Image Using the Thresholding'], title=False)



8.3.2.2. THRESH_BINARY_INV Thresholding#
“THRESH_BINARY_INV” is a thresholding technique used in image processing to create a binary image from a grayscale image. In this technique:
For each pixel at position
(x, y)in the source grayscale image:If the pixel’s intensity value at
(x, y)is greater than the specified threshold value, the corresponding pixel in the output binary image is set to 0 (usually 0).If the pixel’s intensity value at
(x, y)is less than or equal to the threshold value, the corresponding pixel in the output binary image is set to the maximum value (often 255).
In mathematical terms, this can be expressed as:
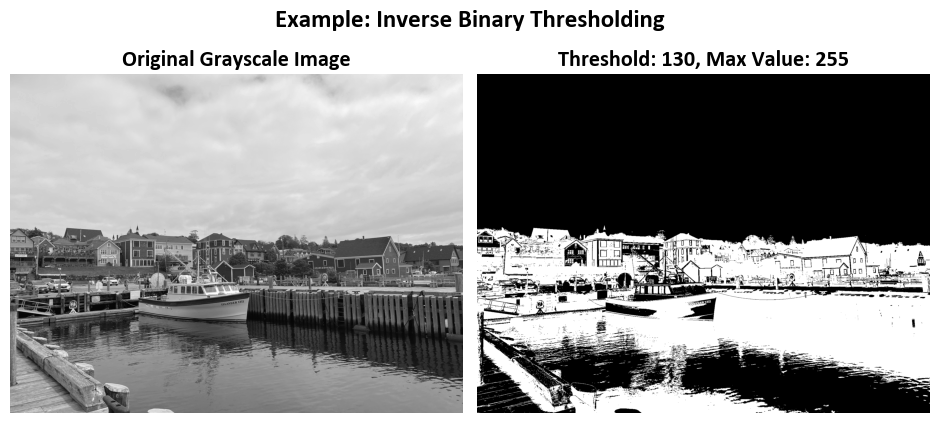
In simple words, “THRESH_BINARY_INV” inverts the behavior of “THRESH_BINARY.” It results in a binary image where pixels above the threshold become black, and pixels equal to or below the threshold become white. This thresholding technique is useful in various image processing tasks, such as object segmentation and feature extraction, where objects of interest are typically darker than their background.
For a complete description of this technique and its usage, you can refer to the OpenCV documentation on thresholding.
Example - Inverse Binary Thresholding Image Transformation:
import cv2

# Iterate through the Images dataset
for Img in Images:
    # Convert the image to grayscale
    Img_grayscale = cv2.cvtColor(Img, cv2.COLOR_BGR2GRAY)

    # Apply inverse binary thresholding to create a binary mask
    _, mask = cv2.threshold(Img_grayscale, 130, 255, cv2.THRESH_BINARY_INV)

    # Display the grayscale image and the binary mask
    _ = ImShow([Img_grayscale, mask], ['Original Grayscale Image', 'Threshold: 130, Max Value: 255'],
              title='Example: Inverse Binary Thresholding', grayscale=True)

    # Apply a filter using the binary mask
    Img_Filtered = img_filter(Img, mask)

    # Display the original image and the filtered image
    _ = ImShow([Img, Img_Filtered], ['Original Image', 'Filtered Image Using the Thresholding'], title=False)

8.3.2.3. Truncate Thresholding#
“THRESH_TRUNC” is a thresholding technique used in image processing to modify pixel values in a grayscale image based on a specified threshold value. In this technique:
For each pixel at position
(x, y)in the source grayscale image:If the pixel’s intensity value at
(x, y)is greater than the specified threshold value, the corresponding pixel in the output image is set to the threshold value itself.If the pixel’s intensity value at
(x, y)is less than or equal to the threshold value, the corresponding pixel in the output image retains its original intensity value from the source image.
In mathematical terms, this can be expressed as:
In simpler terms, “THRESH_TRUNC” modifies the pixel values such that any value in the source image above the threshold value is replaced with the threshold value, while values at or below the threshold remain unchanged. This thresholding technique can be used for various image enhancement and adjustment tasks in image processing.
For a comprehensive description and examples of “THRESH_TRUNC,” you can refer to the OpenCV documentation on thresholding.
Example - Truncate thresholding Image Transformation:
import cv2

# Iterate through the Images dataset
for Img in Images:
    # Convert the image to grayscale
    Img_grayscale = cv2.cvtColor(Img, cv2.COLOR_BGR2GRAY)

    # Apply truncation thresholding to create a binary mask (THRESH_TRUNC)
    _, mask = cv2.threshold(Img_grayscale, 130, 255, cv2.THRESH_TRUNC)

    # Display the grayscale image and the binary mask
    _ = ImShow([Img_grayscale, mask], ['Original Grayscale Image', 'Threshold: 130, Max Value: 255'],
               title='Example: Truncate Thresholding Image Transformation', grayscale=True)

8.3.2.4. To-Zero Thresholding#
“THRESH_TOZERO” is a thresholding technique used in image processing to modify pixel values in a grayscale image based on a specified threshold value. In this technique:
For each pixel at position
(x, y)in the source grayscale image:If the pixel’s intensity value at
(x, y)is greater than the specified threshold value, the corresponding pixel in the output image retains its original intensity value from the source image.If the pixel’s intensity value at
(x, y)is less than or equal to the threshold value, the corresponding pixel in the output image is set to 0.
In mathematical terms, this can be expressed as:
In simpler terms, “THRESH_TOZERO” modifies the pixel values such that any value in the source image above the threshold value is preserved as is, while values at or below the threshold are set to 0. This thresholding technique can be used for various image processing tasks, such as emphasizing regions of interest or reducing noise in images.
For a comprehensive description and examples of “THRESH_TOZERO,” you can refer to the OpenCV documentation on thresholding.
Example - To-Zero thresholding Image Transformation:
import cv2

# Iterate through the Images dataset
for Img in Images:
    # Convert the image to grayscale
    Img_grayscale = cv2.cvtColor(Img, cv2.COLOR_BGR2GRAY)

    # Apply to-zero thresholding to create a binary mask (THRESH_TOZERO)
    _, mask = cv2.threshold(Img_grayscale, 130, 255, cv2.THRESH_TOZERO)

    # Display the grayscale image and the binary mask
    _ = ImShow([Img_grayscale, mask], ['Original Grayscale Image', 'Threshold: 130, Max Value: 255'],
               title='Example: To-Zero Thresholding', grayscale=True)

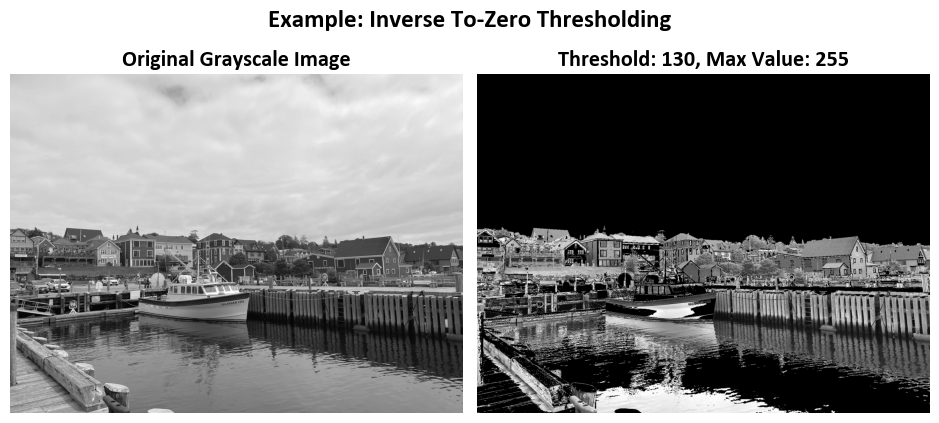
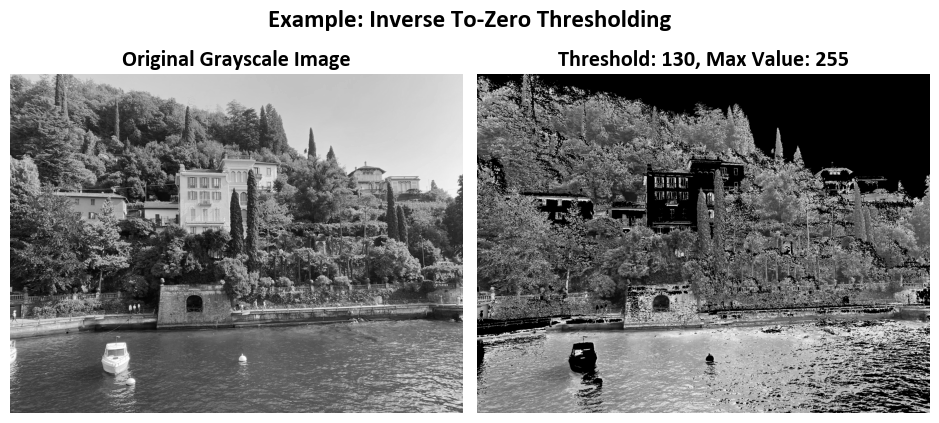
8.3.2.5. Inverse To-Zero Thresholding#
The cv2.THRESH_TOZERO_INV thresholding operation is a method used in image processing to modify pixel values in a grayscale image based on a predefined threshold value. It is part of the OpenCV library, a powerful tool for computer vision tasks. This specific thresholding operation follows the formula:
For each pixel in the source image, if its intensity value (brightness) is greater than the specified threshold value, it is set to 0 in the output image.
Conversely, if the pixel’s intensity is equal to or less than the threshold value, it retains its original intensity in the output image.
This thresholding technique is particularly useful for enhancing certain features or removing noise in images where pixel values above a certain threshold are considered significant. Pixels below the threshold remain unchanged, while those above it are set to zero.
For more detailed information and examples of using cv2.THRESH_TOZERO_INV, you can refer to the OpenCV documentation.
Example - Inverse Inverse To-Zero thresholding Image Transformation:
import cv2

# Iterate through the Images dataset
for Img in Images:
    # Convert the image to grayscale
    Img_grayscale = cv2.cvtColor(Img, cv2.COLOR_BGR2GRAY)

    # Apply inverse to-zero thresholding to create a binary mask (THRESH_TOZERO_INV)
    _, mask = cv2.threshold(Img_grayscale, 130, 255, cv2.THRESH_TOZERO_INV)

    # Display the grayscale image and the binary mask
    _ = ImShow([Img_grayscale, mask], ['Original Grayscale Image', 'Threshold: 130, Max Value: 255'],
               title='Example: Inverse To-Zero Thresholding', grayscale=True)
8.3.3. AdaptiveThresholding (Optional Content)#
The function “cv2.adaptiveThreshold” in Python is a part of the OpenCV library, which is used for image processing. It performs adaptive thresholding on a source image, producing a binary (grayscale) image based on the local properties of the input image:
cv2.adaptiveThreshold(src, maxValue, adaptiveMethod, thresholdType, blockSize, C[, dst]) -> dst
Parameters:
src: Input image (single-channel, 8-bit or 32-bit floating point).maxValue: The maximum value to assign to pixels that pass the adaptive thresholding. Typically set to 255 for binary images.adaptiveMethod: Method used to calculate the threshold value for each pixel. It can take one of the following values:cv2.ADAPTIVE_THRESH_MEAN_C: Threshold value is the mean of the neighborhood area.cv2.ADAPTIVE_THRESH_GAUSSIAN_C: Threshold value is the weighted sum of neighborhood values where weights are a Gaussian window.
thresholdType: Type of thresholding to apply. It can take one of the following values:cv2.THRESH_BINARY: Pixels with values greater than the calculated threshold are set tomaxValue, and pixels below are set to 0.cv2.THRESH_BINARY_INV: Inverse binary thresholding, where pixels above the threshold are set to 0, and pixels below are set tomaxValue.
blockSize: Size of the neighborhood area (odd number, typically 3, 5, 7, etc.). The threshold is calculated based on the pixel values within this local region.C: Constant subtracted from the mean (or weighted mean, in case of Gaussian) to calculate the final threshold value. It allows adjusting the sensitivity of the thresholding.dst(optional): Destination image where the result will be stored. If not provided, a new image will be created.
Returns:
The output image (dst) after applying the adaptive thresholding.
Usage:
This function is useful for segmenting an image into regions of interest, separating objects from the background, or enhancing features in images with varying lighting conditions. The adaptive thresholding method helps handle variations in local image intensity, making it particularly useful for images with uneven illumination.
Remark
The main difference between cv2.threshold and cv2.adaptiveThreshold in OpenCV lies in how they determine the threshold values for converting a grayscale image into a binary image.
cv2.threshold:
In
cv2.threshold, you specify a single global threshold value (an integer) that is applied uniformly to all pixels in the image. This means that the same threshold value is used for every pixel in the image.Pixels with intensity values greater than the specified threshold value are set to a maximum value (often 255), and pixels with values less than or equal to the threshold value are set to 0.
_, binary_image = cv2.threshold(src, threshold_value, max_value, cv2.THRESH_BINARY)
cv2.adaptiveThreshold:
In
cv2.adaptiveThreshold, the threshold value is calculated individually for each pixel based on the local neighborhood of that pixel. This allows for adaptive thresholding, where the threshold value can vary across different regions of the image.You need to specify two additional parameters:
blockSize(the size of the local neighborhood for calculating the threshold) andC(a constant subtracted from the mean or weighted mean, depending on the method chosen). These parameters control the adaptiveness of the thresholding.cv2.adaptiveThresholdsupports two adaptive thresholding methods:cv2.ADAPTIVE_THRESH_MEAN_C: The threshold value for each pixel is the mean of the pixel values in its local neighborhood.cv2.ADAPTIVE_THRESH_GAUSSIAN_C: The threshold value for each pixel is the weighted sum of pixel values in its local neighborhood, with weights determined by a Gaussian window.
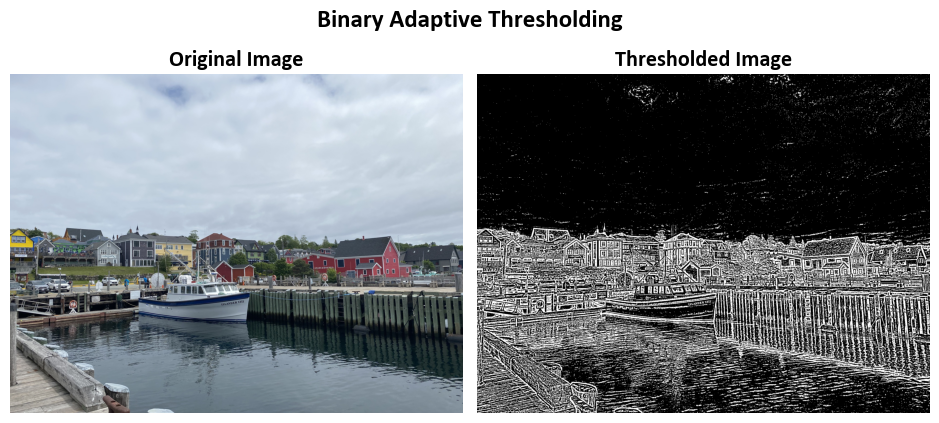
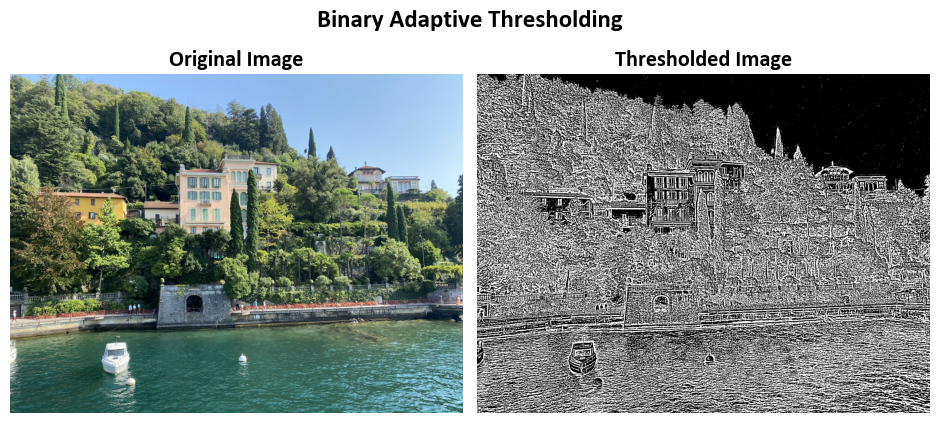
binary_image = cv2.adaptiveThreshold(src, max_value, adaptiveMethod, thresholdType, blockSize, C)
8.3.3.1. Binary Thresholding Image Transformation#
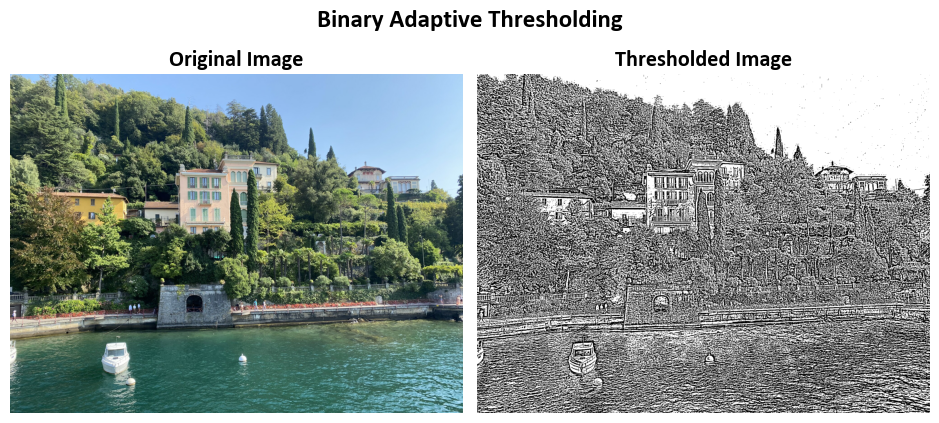
In the context of image thresholding, the cv2.THRESH_BINARY method is a fundamental technique used to create binary images from grayscale ones. The core idea can be expressed as follows:
For more detailed information, you can refer to the OpenCV documentation.
Example - Binary Thresholding Image Transformation:
import cv2

# Iterate through the Images dataset
for Img in Images:
    # Convert the image to grayscale
    Img_grayscale = cv2.cvtColor(Img, cv2.COLOR_BGR2GRAY)

    # Apply adaptive thresholding to the "Img_grayscale" image
    # Set the maximum value after thresholding to 255
    # Use cv2.ADAPTIVE_THRESH_MEAN_C as the adaptive method
    # Use cv2.THRESH_BINARY as the threshold type
    # Set the block size for local thresholding to 11x11
    # Set the constant subtracted from the mean to 2
    Out = cv2.adaptiveThreshold(Img_grayscale, 255, cv2.ADAPTIVE_THRESH_MEAN_C, cv2.THRESH_BINARY, 11, 2)

    # Show both the original "Img" image and the thresholded "Out" image
    fig, ax = ImShow([Img, Out], ['Original Image', 'Thresholded Image'],
                     title='Binary Adaptive Thresholding', grayscale=True)

8.3.3.2. Inverse Binary Thresholding Image Transformation#
For more detailed information, you can refer to the OpenCV documentation.
Example - Inverse Binary Thresholding Image Transformation:
import cv2

# Iterate through the Images dataset
for Img in Images:
    # Convert the image to grayscale
    Img_grayscale = cv2.cvtColor(Img, cv2.COLOR_BGR2GRAY)

    # Apply adaptive thresholding to the "Img_grayscale" image
    # Set the maximum value after thresholding to 255
    # Use cv2.ADAPTIVE_THRESH_MEAN_C as the adaptive method
    # Use cv2.THRESH_BINARY_INV as the threshold type
    # Set the block size for local thresholding to 11x11
    # Set the constant subtracted from the mean to 2
    Out = cv2.adaptiveThreshold(Img_grayscale, 255, cv2.ADAPTIVE_THRESH_MEAN_C, cv2.THRESH_BINARY_INV, 11, 2)

    # Show both the original "Img" image and the thresholded "Out" image
    fig, ax = ImShow([Img, Out], ['Original Image', 'Thresholded Image'],
                     title='Binary Adaptive Thresholding', grayscale=True)
